I made a cake this past weekend for a cousin's 6th birthday, and I thought this would be a good opportunity to reiterate the idea of working with what you have on hand. Rather than going out and purchasing a cake mold, I thought I would get creative with the vessels I had already and build a cake. It can be challenging, but if you're up for a challenge, it can be a lot of fun, and extremely rewarding when you behold your final creation.
I decided on a giant cupcake, after much research and inspiration-finding on the interwebs. I thought it would be a great conversation piece, as well as a little bit out there, much like the personality of the spunky, fun-loving little girl we would be celebrating. Yes, a giant cupcake would be perfect. Now to the construction.
The trick to cake-building is simple: any form can be broken down into simple shapes, which can then be combined using fillings and frosting. You can even get a better visualization of the shapes by playing around with the empty cake tins and baking vessels. Anything oven-proof can be used, such as glass pans, metal tins, ceramic ramekins, stainless steel mixing bowls...so long as it is OVENPROOF. Once you've checked that, you can begin creating.
A cupcake is simple enough, I created mine with two 8"-round cake pans and a large stainless steel mixing bowl which I would flip upside down for the top. Make sure to generously grease and flour all the molds before filling them with batter, to ensure proper release of the cake. You don't want to have to patch together cake pieces later on. Then fill them with a solid cake batter. I say solid because this way, several layers of cake can be piled up without the entire form collapsing under its own weight. Otherwise, you start getting into a territory involving plastic plates and dowel rods and such, a territory best navigated by true patissiers. and not the home cake-builder like myself. I made a pound cake batter found in the Betty Crocker Cookbook, the Loaf O' Gold. One recipe filled both round cake pans, and a second recipe filled the bowl. Once baked, I got to work building.I trimmed the tops flat with a large, serrated knife to create a flat surface, better for piling layers.
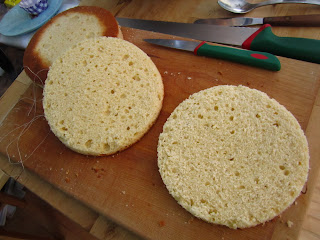
Dental floss can be your best friend when it comes to cake layers. I wanted to slice each cake in half, and fill them with strawberry jam, creating more depth of flavor in each slice, rather than just icing. Dental floss can slice even the thinnest cake layer in half. How? Holding one end of the floss, wrap it around the centre of the cake, crossing the ends. Now pull both ends in opposite directions, keeping them crossed. The floss should pull right through the centre of the cake, slicing it cleanly in half. Tah dah!
Jammed.
I frosted the top of the first layer with a basic buttercream frosting, topped it with the second cake, and frosted the outside generously.
I dipped a thin spatula in hot water and used it to smooth and detail the sides to look like a cupcake wrapper. I coated the top with a good layer of frosting "glue" on which to lay the cupcake's cap.
Using a serrated knife, I sliced the "bowl" cake in half, and thinly iced it to prevent crumbing.
I gently laid the cap on the cupcake, then prepared a recipe of lavender frosting to finish the cupcake.
A dash of size-appropriate sprinkles and there you go! One giant cupcake! But I wasn't happy with it - not yet, anyway. I found that the base wasn't tapered enough to signify a cupcake. It seemed more like a mushroom. I needed to solidify that this was indeed a cupcake. That meant more cupcakes.
Chocolate cupcakes, in different sizes and full of chocolate chips. I topped the mini ones with more purple frosting and colored sugars, and I frosted the regular cupcakes with white buttercream.
Then I piled all the cupcakes together on a platter, rather haphazardly, towering here and there on top of each other. It all looked very fantastical and cheery. I was happy. And as I understand it, the birthday girl was happy with her cake, too.


No comments:
Post a Comment