Tuesday, February 28, 2012

Oscar potluck and Food porn


****************************************

Please note, the following post may contain content not suitable for younger viewers, depending on how you look at things. Otherwise, it just contains tasty food pictures.

****************************************

This past Sunday, my friends and I gathered, as we often to, to have a potluck. We like to watch the Oscars together, playing movie-themed bingo and commenting on the fashion sense of some of the attendees, but mostly, we get together because we like food and we like to eat. We also like to challenge ourselves when it comes to potlucks, choosing a theme to which we have create our contributions. Past examples include finger foods (complete with fingers!), Mexican, Canadian, the letter P, Ragin' Cajun, and Geek. This time around, we properly challenged ourselves with the suggestive Perverted Potluck. Not really Oscars caliber, I know, but I decided to go a little more classy with my offerings, focusing primarily on good food turned dirty, as opposed to making perverted food classy.
I made a delicious squid salad the day before, which gave the squid a whole day to marinate in the lemony dressing, and added the garnishes Sunday morning. (inspiration came from this recipe on Epicurious, as well as some delicious seafood salads I tasted on a recent trip to Italy)
Next, I piped gruyere choux pastry in double mounds for the gougere "boobies" and cut pepper rounds using a spare decorating tip. Once bakeds, the little puffs made the perfect accompaniment to the salad. (Recipe found in the book French Women for All Seasons by Mireille Giuliano)
 
 And the piece de resistance, my red velvet cake and strawberry brochettes, served with sweetened whipped cream. I used a cookie cutter to cut rounds of cake from a jelly roll pan, and strung four pieces of cake and one well-shaped strawberry onto a bamboo brochette stick. I stuck each stick into a half papaya on a serving platter. I am very proud of this dish - it came out exactly as I had hoped, as well as getting the reaction I had hoped for. (The recipe for the cake come courtesy of the lovely Bakerella)
Don't they look delicious topped with a little cream?

Leftover cake? What a trifle!

 
 I found myself with a bowlful of leftover cake yesterday, due to a lot of cake-trimming for an Oscars potluck dish. Red velvet cake, no less. I couldn't just let all that good cake go to waste! (Believe me, in this house, cake NEVER goes to waste, but I was feeling a might bit creative.) Though there are many great uses for leftover cake, including the ever-popular cake pops by the divine miss Bakerella, I decided to go with an old stand-by my mother taught me, the English trifle.
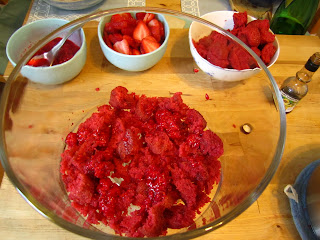
I took all of that beautiful crumb and cut it up into pieces. They don't have to be bite-sized, but make your cake bits manageable enough to ease the building of the trifle later on. I had all the trimmings from a jelly roll pan, plus mini cupcakes I baked to use up the extra batter that did not fit in the pan. (In case you're wondering, I got the recipe for the red velvet cake from Bakerella as well. If you aren't yet familiar with her sweets, you NEED to go see her site. NOW.)
 Trifle needs fruit to add to the melange of flavors and textures the dessert showcases. Since I was already going with a red theme, I decided to slice up a box of strawberries I had in the fridge, also left over from the Oscars potluck.

On a side note, the strawberries available in Quebec this winter have been exceptionally good, and if you happen to find yourself up here in the snow, might I suggest trying some? I know they're very imported, but the flavor has gotten much better in recent years. Nothing like those red-on-the-outside, white-in-the-middle excuses for fruit we use to get from Florida. But I digress...
This dessert needs something wet to hold it together, like the mortar between bricks. You can use any kind of pudding, custard, whipped cream or whipped topping for this application, but I like to mix custard and whipped cream to make a lighter, creamier filling. Yes, I make my custard from a mix. So sue me, I like the ease.
 After the custard is cooled, I fold in sweetened whipped cream, again left over from the Oscars potluck. What did I not have leftover from that potluck?! Anyway, now that the key trifle components are prepared, it's time to begin the assembly!
 First a layer of cake pieces go into the bottom of my trifle bowl. If you don't have a trifle bowl, use a glass bowl, a fish bowl, a flower vase, anything transparent. You want to see the layers of goodness.
 Next, the cake is drizzled with a liqueur that compliments the flavors of the dish, be it rum, cherry kirsch, amaretto, creme de cassis, whatever you like. Another good drizzler is jam, melted a little first, to add that hint of sweetness, and moisten the cake ever so slightly. I did a mix of raspberry jam and creme de cassis in my trifle.
  
I spread a layer of my custard-whipped cream mixture over the cake, trying to mush it into all the cracks and crevices.
On top of the custard cream, I placed a layer of sliced strawberries.
That's one layer. Cake, liqueur and jam drizzle, custard cream and berries. This layering gets repeated until there are not more ingredients left, finishing with cream to create a smooth top.
I managed three layers of trifle-y goodness, oozing with juicy berries. So yummy.
I saved a few strawberry slices to decorate the top of the trifle - that's why finishing with a smooth cream layer is a good  idea.
 
That's it! The trifle goes in the fridge for a little to chill, but you could also serve it right away. Don't forget to cover the dish with a lid or plastic wrap so it doesn't dry out and you can easily keep it for a few days - that is, if you don't eat it all in one sitting! Now go make some!

For more trifle-making deliciousness, check here.

Wednesday, February 22, 2012

Internet inspiration realized!

 I've been doing a lot of web browsing lately, just looking at stuff. Nothing in particular, either, just stuff. I get caught up in craft blogs. sites about food and wine, pages full of upcycling, and on and on. I just click on am interesting link, which leads to an interesting page, which might contain another link leading to another page...You get the idea. It's easy to to lose yourself on the internet for hours, and never really know how you got there in the first place! So while browsing, I find myself taking notes of things I see that I like, that I would like to cook, or sew, or otherwise recreate.

 I returned to my notes for inspiration the other day, deciding on a beautiful little clutch I could whip up on the sewing machine.
Using newspaper, I drew out pattern pieces which I then used to cut out the fabric. I tend to chose projects that have very geometric shapes, visible seams or easy construction. I, in no way, consider myself a pro at this, I just like to tinker around with the sewing machine.The band measures 9 inches by 3 inches, and the pouch section measures 15 inches by 9 inches, with rounded corners along the bottom edge. All measurements include 1/2-inch seam allowances.
 I love this fabric. Every time I go looking for inspiration in the fabric closet, I come across this beauty, never really knowing what I should do with it. Finally, I have a project that will do it justice. I paired it with a brown vinyl left over from a costuming project, and a matching teal cotton I pulled from the quilting leftovers. 
 To match the bottom pouch section to the top band, I had to do a little gathering. It creates a nice visual effect, as well as providing ample storage space in the pouch section of the clutch.
 I pinned the pouch to the vinyl band, and stitched the two pieces together. I did this for the other half of the clutch, as well as both sides of the lining.
 I pressed the extra fabric towards the band section, then top-stitched the band for added strength and nicely-stitched details. I do like nicely-stitched details!
 I stitched the two halves of the lining together. Important: make sure to leave an opening at the bottom of the bag, to turn the piece right side out, Otherwise, be prepared to take up your seam ripper to free your bag!
I added some snaps to the top of the lining, to close the bag better. This is optional - the bag is small enough that a closure is not that important, but should you drop your clutch, snap will prevent your stuff from spilling out and all over the floor. Follow the package direction for installation, or check out some of the awesome vids available on Youtube. That's what I did.
After stitching both sides of the bag together, I turned the outer layer right side out.
I inserted the outside into the lining layer, which is still inside out. This way, the right sides of the fabric are facing each other.
With the seams lined up, I pinned the top edges together...
...and stitched.
See, this is where that hole in the bottom comes in handy. Pull the whole bag through the hole in the bottom of the lining and voila! you bag is turn right side out. Otherwise, get out your seam ripper...
Push the lining inside the bag, press the edge, then top-stitch the top edge.
 One last line of stitching, this time by hand, to close up the bottom of the lining, and that's it! I managed to finish up my clutch in about 4 hours, with a little playing around with the pieces and such - should take about 3 hours the next time. Think of it as a nice little afternoon project, and elegant enough for an evening out! Now, what to wear...

Tuesday, February 14, 2012

Happy Valentine's Day - part two -

Valentine's Day is upon us, and when I think of love and all the sweet sticky feelings that come along with the handwritten cards and secret love letters, I think gooey treats. What better way to enjoy the day than to whip up a batch of sticky sweet marshmallow popcorn treats, alone or with little ones, to be enjoyed by the whole family! I recruited the help of my very special assistant, Tiny Hands, who is never far away when it comes to cooking up special treats in the kitchen. Donning our aprons, we set to work making a mess of the kitchen!
 
I took care of the hot stuff first, opting to complete the more dangerous steps before Tiny Hands could get her hands on the popcorn mixture. We would not want to have an accident and end up with burnt Tiny Hands, now would we? In a medium pot over low heat, I melted together 1/4 cup butter with 6 cups miniature marshmallows. Once the mixture turned smooth, I mixed in 1 package of cherry gelatin powder. This is step one to transforming regular popcorn balls into Valentine's popcorn balls! I poured the hot mixture over 12 cups of plain popped popcorn in a large bowl.
 Using a wooden spoon, I mixed the hot marshmallow goo into the popcorn. Tiny Hands then poured in some Valentine-themed add-ins: 1/2 cup each of red candied peanuts, dried cranberries and yogurt-covered raisins. We added these after the initial mixing, since the mixture has cooled down enough not to melt the yogurt coating.
 
The mixture will be quite sticky at this point, but there is enough marshmallow in the mix to keep it malleable. This will give Tiny Hands plenty of time to fashion the popcorn balls into a heart-shaped cookie cutter, a second step to making these treats very Valentine's-esque!
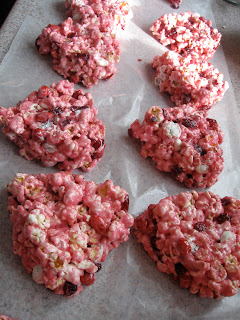
We made sure to butter our hands as well as the mold, and worked on a sheet of waxed paper to keep the mess to a minimum. Freshly greased, Tiny Hands and I dove into the popcorn with both hands, grabbing at the stuff and balling it up. I portioned out a good handful of mixture, which Tiny Hands then jammed into the heart-shaped cookie cutter, with a little help. When we were happy with the look, we pushed the heart through the cutter onto the waxed paper to cool, and moved onto the next popcorn ball.
Using up all the popcorn mixture, we managed to make a dozen 4-inch long hearts, minus a few mouthfuls, of course! Sometimes Tiny Hands just can't help herself and has to taste everything. Sometimes I can't help myself, either. Yum.
I wrapped each popcorn heart in cellophane for easy gifting, and left the rest of the decorating in the capable hands of Tiny Hands.
 Early, Tiny Hands had painted up a few sheets of paper with her finger paints(today is a messy, messy day!). Using the same cookie cutter as a template, I cut hearts out of red-painted paper. She "wrote" messages and signed each one, then added a heart sticker for added impact. We taped a Valentine on each of the wrapped popcorn hearts and voila! a tasty, handmade dessert  for Tiny Hands to gift to every member of the family.
 
Tiny Hands and I had a great time mucking around in the popcorn ball mix, but mostly because we got to spent time together. Make sure to share a moment with your family today, whether it be over sticky gooey Valentine's treats, or just over a cup of tea, and let them know you care. 

Happy Valentine's Day.  <3

Tuesday, February 7, 2012

It's time for some lovin'!

 It's the first day of February, so in honour of the upcoming St-Valentine's day, I decided to dive into my scraps bin in the sewing room, and stitch together a little something for the front door.
 Well, maybe I had a little help with the scraps.Tiny Hands enjoys all the pretty colours and imagines what beautiful costumes could be crafted together using all of them, all at once. 
 
 I, on the other hand, went for a more monochromatic look, pulling out lots of burgundys, reds and pinks. Each of these pieces has a story, coming from old projects, new costumes, altered clothing and such. Too small to create anything large, they get tossed into a large bin in the corner, often forgot until an idea like this comes along. I picked my favorites, and played around with the arrangement until I was happy with the look.
 I trimmed the rough edges and squared up the lop-sided pieces, to make the assembly easier.
 Then, I began sewing the pieces together, two by two, smaller squares first, working my way up to larger blocks made up of several smaller pieces.
I liken this piecing technique to machine quilting, but by no means do I call this quilting. I call this a complex puzzle of a craft, trying to figure out which order to sew the pieces in to obtain one large, colourful bit at the end.
Between seams, which I set at a uniform 1/4-inch, or to the edge of my machine's presser foot, I make sure to iron the fabric. This makes for a much cleaner finished product. I only recently learned the benefits of always pressing your seams when sewing. I once believed it was only a waste of precious sewing time. Believe me, once you do press your seams, and see how much nicer your finished projects look, you'll become a presser, too. Maybe even obsessively so. It's hard to stop.
One last, long seam to go and...
I find myself with a large mosaic of scrap fabric pieces. Now comes the assembly!
I cut a heart out of cardboard, which I made sure would fit within the confines of my quilted fabric. This cardboard with provide strength to the project. Without it, the heart would flop down into a folded mess on your front door!
Using the cardboard as a template, I marked and cut a heart from my quilted piece. I also cut a second heart from a large scrap of red cotton for the back, and a third from an old bedspread cover, to provide thickness to the heart, and to protect the cardboard which will be inserted inside the final hanging piece.
Right sides together, I sewed the quilted front piece to the plain red cotton back piece. I trimmed the excess fabric and clipped the curved edges. Note that I left the entire right side past the curved top open to insert the cardboard and bedspread piece later.
I turned the heart inside out and pressed the edges flat.
Then I carefully eased the cardboard and bedspread hearts inside the red heart.
Finally, I folded the unfinished edges over, pinned them together, and stitched the hole on the right side of the heart closed.
Now I just needed a way to hang the heart on the front door! I rummaged through the lace & ribbon box for ideas, and pulled out this piece of cord, already tied in a knot. It seemed perfect for the job!
I re-knotted the edges and trimmed some frayed pieces, then placed the cord at the top of heart.
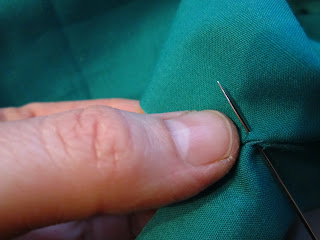
Using a needle and thread, I stitch the knot securely in place by hand. Then I tried it out.
Tah dah! 

One big, beautiful, hand-crafted heart to let everyone know that yours is a house full of love! This design took all of 2 hours to stitch together, and you can easily customize it to include particular patterns, specialized stitches, or even more hearts of different sizes! It's really all up to you, your imagination and what you have on hand. Now go out and get sewing for Valentine's Day!