Wednesday, June 6, 2012

Loving the Leafy Greens

 I love swiss chard. I LOVE SWISS  CHARD.  Can I make that any more clear? Odd thing, though, I think my love for the leafy greens stems from my absolute adoration for this pie. Yeah. So, when grocery-shopping last week, I spotted the vegetable on sale and bought myself a beautiful bouquet. Then, of course, I had to bake a pie.
It really is such a simple pie to make, but feels daunting at times because each ingredient needs to be prepared. The swiss chard needs to be blanched. The raisins need to be soaked to plump them. The nuts need to be toasted. The dough has to be rolled out. Once all that is done, it's really an easy recipe to put together. A pie of cake, right?
 Ok, reality check - I can get everything prepped and the pie in the oven in 30 minutes. So really, not that bad.
 And the beauty of this pie? Yes, it is filled to the brim with swiss chard, but it is held together with an sweetened eggy mixture flavored with orange zest. Combine that with the raisins and pine nuts and you get this savoury-sweetness than lends itself well to dinner, lunch, and breakfast. What? Yes, even breakfast. 
 
 Sure, you can serve a slice, still warm from the oven, with a delicious strawberry-arugula salad, but just think of how delicious it could be with a dusting of powdered sugar and your morning coffee! So good!

 So my fridge is a little emptier, my oven a little more over-worked, and a fresh swiss chard pie cools on the counter, ready for dinner. I tossed up a nice fresh spring salad, cut a few slices and we moved out to the deck. The weather is so fickle lately, with rain and cool winds more prevalent this spring, we take advantage of any moment the sun shines. It was a beautiful evening for a meal outside, a tête-à-tête al fresco. 

Swiss Chard, Raisin and Pine Nut Tart

1/2 cup raisins
2 lbs. swiss chard, chopped
1 egg
1/2 cup milk
1 1/2 tbsp. sugar
zest of 1 orange
1/3 cup toasted pine nuts(almonds work great as an inexpensive alternative)
One recipe butter pastry dough (see below)

Bring raisins to a boil in 1 cup water in a small saucepan. Let stand, covered, for 30 minutes; drain. Blanch swiss chard in a large pot of boiling water 2 minutes. Drain, cool and squeeze out excess water. In a large bowl, whisk together egg, milk, sugar and orange zest. Stir in raisins, swiss chard and pine nuts.
Roll out half of dough on a lightly floured surface into a large enough circle to fit  in a 9" quiche pan. Place dough in pan but  do not trim edges.
Preheat oven to 400 degrees F.
Roll out second half of dough large enough to fit top of pie. Spread swiss chard mixture evenly into shell, then top with second piece of dough. Using water to dampen edges, seal crust and flute edges. Cut 3 steam vents in top crust.
Bake until top is golden, about 1 hour. Transfer to a rack to cool.

Butter Crust Pastry

2 cups all-purpose flour
1 tsp. salt
3/4 cup butter
6-7 tbsp. cold water

Mix together flour, salt and butter, using fingers or a pastry cutter, until mixture resembles a fine crumb.Add cold water, 1 tablespoon at a time, until mixture forms a ball. Knead gently once or twice, then use in desired recipe. Makes 1 2-crust pie or tart.

Friday, May 4, 2012

Dandelions? Yum!

So I think that my mind and body have been frozen in a state of laziness for the past, oh, month or so. Let me explain: Somewhere around the middle of March, the weather got so beautiful, hot and sunny, that my mind convinced the rest of me of the imminent coming of summer, and end of the deep cold of winter. I opened the windows to air out the house. I started rounding up hats, mitts and scarves, along with the winter coats and boots, ready to store back in the attic for another year. I let the cats run free as I watched the last bits of snow melting from the yard, looking forward to seeing crocuses and tulips emerging from the ground soon. In short, I was too eager. Not a week later, the temperature dropped back down again. As a result, I got a nasty cold, which stifled my creativity, so even if I was in the mood to make something, my body quickly put on the brakes.
 Finally, a sign of spring, enough to pull me out of my funk and get the creative juices flowing again - the hearty dandelion. You might be wondering, "Wow, the winter has really messed with your brain. How could the lowly dandelion, enemy of good and green lawns everywhere, be inspiring?!" In my kitchen, it makes for our first harvest of the year. Yup, we eat the stuff, and it is delicious. 

Now, I do have to mention a disclaimer here: I live in a quieter area just past the edge of town, am very aware of the animal traffic in my yard and don't use any sprays of any kind. Be aware of your grass before picking and consuming any part of the dandelions on your lawn. If you have frequent dog traffic, or spray your grass in any way for anything, DO NOT consume your dandelions. Come eat mine instead.
 Now that that's taken care of, on to the picking. Dandelion leaves are bitter by nature, but more so once they have flowered, so now is the time for harvesting. Choose small, tender leaves on plants that have buds, and pick by hand. Try to avoid getting too much grass, as you'll just have to sort it out later anyway.
Pick those dandelion leaves to your heart's content, or until your bowl is full, which ever comes first. Toss the contents into a sink full of water to wash away the dirt and grass, which I wasn't careful enough remove in the first place. Slosh them around a whole bunch and when you're satisfied that the leaves are clean, scoop them out of the water by hand and into a strainer or salad spinner to dry.
See how beautiful they look when they're all nice and clean? Now comes the fun part - eating them! Dandelion leaves work really well in recipes that use arugula, since the bitterness is about the same in both. I have not tried cooking with them yet, so I don't know how well they react to being heated. However, I've never really wanted to, since the resulting salad tastes to delicious!
 In the bottom of your salad bowl, whisk together 2 tbsp. olive oil, 2 tbsp. lemon juice, 1 minced clove of garlic, salt and pepper to taste. Add the dandelion leaves and toss to coat. That's it! The lemon juice and garlic compliment the bitterness of the dandelions perfectly and the whole salad tastes so fresh and delicious.
 Along with the salad, I pounded slices of pork tenderloin into cutlets which I then floured and panfried. I also made a simple pasta side with homemade tomato sauce. To serve, I topped each cutlet with the dandelion salad.
 This is a flavour revelation, if I've ever had one. The first time I tried a bite of pork tenderloin, topped with dandelion salad, I was amazed at how good the combination of taste was. You really have to try it. Really. You won't be sorry.

Every spring, once the snow melts, the first thing I know I can always look forward to, without having to plant a single seed in the ground, is a wonderful meal featuring tangy dandelion salad.
Oh, and you know that the rhubarb has begun growing too, right? Can you guess what I'll be cooking up next?

Saturday, March 17, 2012

Irish for the day


Green beer? Yuck. Heck, I don't even like beer. Plus, I can only imagine how awful it must taste, overloaded with food colouring. No, pour me a glass of Bailey's Irish Cream, please, on ice. And if I must have something green, then make it Mint-Chocolate Chip Sugar Cookies. That kind of green I can take!
So for my "Irished" cookies, which are based on a really great recipe for a basic sugar cookie, I made three very important additions. I substituted mint extract for the vanilla in the recipe, added mini chocolate chips to the dough, and finally, I rolled the cookies in green sugar before baking them. It's a really easy cookie recipe and it's super-customizable for any taste and any occasion.
In a large bowl, mix together 2 eggs and 1 cup sugar until they turn lemon-coloured.
Stir in 3/4 c. vegetable oil and 1 tsp. peppermint extract.
Stir 2-1/2 c. flour and 1-1/4 c. baking powder into the liquid mixture. The dough will pull away from the sides of the bowl, but form a soft dough. It is easy to handle and form into balls.
For added texture and taste, I add 1/2 c. mini chocolate chips. You can use regular-sized chips instead, but the mini ones spread out more and make the cookies seem more chip-filled. Yum.
Using a 1-inch ice cream scoop, divide the dough into 1-inch balls. If you don't have a mini ice cream scoop, just roll the balls by hand, but I cannot sing enough praises for my 1-inch ice cream scoop. I use it for cookies, meatballs, melon balls, mashed potatoes, you name it, I have probably scooped it. It really is a very wise investment and will benefit any kitchen arsenal.
Roll the scooped dough into balls and toss them in green decorating sugar. For the amount of dough in this recipe, I managed to use up an entire jar of the stuff, plus a little yellow (!) for the last few cookies. Once the cookies are sugared, place them on a parchment-lined baking sheet.
Bake the cookies in a 350-degree oven for 8 to 10 minutes. You might want to turn the sheets around halfway through baking, and take the cookies out when they begin to brown on the bottom only.
Place the on a rack to cool, and enjoy with a big glass of milk, or maybe even a little Bailey's. I'll leave that decision up to you.

Friday, March 9, 2012

Genesis

Spring is coming. The geese are slowly returning to northern climes. The air is warming up and filled with the sound of chirping birds. On Sunday, we turn the clocks ahead and all of a sudden, the nights won't seem so dark. Plus, I took my fig tree out of hibernation 2 weeks ago, and just look at the little fella grow!


It even has figs! Really makes me want the snow gone and the grass growing now. Yup, spring is the great new beginning of things - the world outside is starting over again. It got me thinking about new beginnings, particularly here, and I realized that I started something myself, but I never really explained the genesis of the project itself. The "why" I did it - why I began a blog called supply on hand.

I wanted to share and talk about how to live within your means, using what you have on hand, but at the same time, I wanted to show how that doesn't necessarily mean boredom! The trick is to build and maintain a great inventory to pull ideas and inspiration from.

One of the best tricks I have for building that endless inventory is to never say no. What does that mean? When offered something free, never, EVER refuse, be it secondhand clothing, and old vase, an unwanted plant or some overstocked canned goods. You might not want it, but accept anyway. Refusal discourages generosity, so the more you take in, the more you'll be considered for donations in the future. This all goes to building that great supply I'm talking about. Do I keep everything? Not always - but I am a firm believer of sharing the wealth, giving away what I don't keep to others who do need it, be it friends, family, or an organization like the Salvation Army.

Stay tuned for more ideas, tips and projects using that supply on hand - and don't forget to turn those clocks ahead one hour on Saturday night before going to sleep!

Wednesday, March 7, 2012

Happy Birthday! Itadakimasu!

Being sick sucks. More so because I have no energy to cook and no appetite. It's sad, really. This week, however, I mustered up enough energy to pull together a great dinner for my beloved's 30-something birthday. I took a trip to my local Asian grocery store and picked up the ingredients for Shabu Shabu, a Japanese hot pot dinner. Following the excellent instructions of Cooking with Dog, I assembled my meal.
 To cook in the dashi broth, along with thinly-sliced beef, I cut up shiitake and enoki mushrooms, chopped up some fresh spinach and baby bok choy, cubed soft tofu and soaked vermicelli noodles.
 For dipping, I mixed up two sauces: Ponzu sauce, a citrusy tasting mix of soy sauce and lime juice, with grated daikon radish and sliced green onion added in, worked great with the delicious slices of beef. The other, a white sesame sauce based on tahini, worked fantastically with the tofu. Yum!
Since my beloved loves sashimi, which was our alternate meal plan for the evening, I picked up a fillet of fresh salmon, which I sliced up and served  soya sauce and wasabi. I love raw fish.
After dinner, we finished the meal off with bowls of matcha green tea, and little mochi, rice dumplings filled with peanut paste, sesame paste or red bean paste. Even though we are both feeling under the weather, I think it was a very enjoyable evening.

Tuesday, February 28, 2012

Oscar potluck and Food porn


****************************************

Please note, the following post may contain content not suitable for younger viewers, depending on how you look at things. Otherwise, it just contains tasty food pictures.

****************************************

This past Sunday, my friends and I gathered, as we often to, to have a potluck. We like to watch the Oscars together, playing movie-themed bingo and commenting on the fashion sense of some of the attendees, but mostly, we get together because we like food and we like to eat. We also like to challenge ourselves when it comes to potlucks, choosing a theme to which we have create our contributions. Past examples include finger foods (complete with fingers!), Mexican, Canadian, the letter P, Ragin' Cajun, and Geek. This time around, we properly challenged ourselves with the suggestive Perverted Potluck. Not really Oscars caliber, I know, but I decided to go a little more classy with my offerings, focusing primarily on good food turned dirty, as opposed to making perverted food classy.
I made a delicious squid salad the day before, which gave the squid a whole day to marinate in the lemony dressing, and added the garnishes Sunday morning. (inspiration came from this recipe on Epicurious, as well as some delicious seafood salads I tasted on a recent trip to Italy)
Next, I piped gruyere choux pastry in double mounds for the gougere "boobies" and cut pepper rounds using a spare decorating tip. Once bakeds, the little puffs made the perfect accompaniment to the salad. (Recipe found in the book French Women for All Seasons by Mireille Giuliano)
 
 And the piece de resistance, my red velvet cake and strawberry brochettes, served with sweetened whipped cream. I used a cookie cutter to cut rounds of cake from a jelly roll pan, and strung four pieces of cake and one well-shaped strawberry onto a bamboo brochette stick. I stuck each stick into a half papaya on a serving platter. I am very proud of this dish - it came out exactly as I had hoped, as well as getting the reaction I had hoped for. (The recipe for the cake come courtesy of the lovely Bakerella)
Don't they look delicious topped with a little cream?

Leftover cake? What a trifle!

 
 I found myself with a bowlful of leftover cake yesterday, due to a lot of cake-trimming for an Oscars potluck dish. Red velvet cake, no less. I couldn't just let all that good cake go to waste! (Believe me, in this house, cake NEVER goes to waste, but I was feeling a might bit creative.) Though there are many great uses for leftover cake, including the ever-popular cake pops by the divine miss Bakerella, I decided to go with an old stand-by my mother taught me, the English trifle.
I took all of that beautiful crumb and cut it up into pieces. They don't have to be bite-sized, but make your cake bits manageable enough to ease the building of the trifle later on. I had all the trimmings from a jelly roll pan, plus mini cupcakes I baked to use up the extra batter that did not fit in the pan. (In case you're wondering, I got the recipe for the red velvet cake from Bakerella as well. If you aren't yet familiar with her sweets, you NEED to go see her site. NOW.)
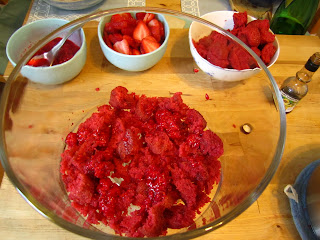
 Trifle needs fruit to add to the melange of flavors and textures the dessert showcases. Since I was already going with a red theme, I decided to slice up a box of strawberries I had in the fridge, also left over from the Oscars potluck.

On a side note, the strawberries available in Quebec this winter have been exceptionally good, and if you happen to find yourself up here in the snow, might I suggest trying some? I know they're very imported, but the flavor has gotten much better in recent years. Nothing like those red-on-the-outside, white-in-the-middle excuses for fruit we use to get from Florida. But I digress...
This dessert needs something wet to hold it together, like the mortar between bricks. You can use any kind of pudding, custard, whipped cream or whipped topping for this application, but I like to mix custard and whipped cream to make a lighter, creamier filling. Yes, I make my custard from a mix. So sue me, I like the ease.
 After the custard is cooled, I fold in sweetened whipped cream, again left over from the Oscars potluck. What did I not have leftover from that potluck?! Anyway, now that the key trifle components are prepared, it's time to begin the assembly!
 First a layer of cake pieces go into the bottom of my trifle bowl. If you don't have a trifle bowl, use a glass bowl, a fish bowl, a flower vase, anything transparent. You want to see the layers of goodness.
 Next, the cake is drizzled with a liqueur that compliments the flavors of the dish, be it rum, cherry kirsch, amaretto, creme de cassis, whatever you like. Another good drizzler is jam, melted a little first, to add that hint of sweetness, and moisten the cake ever so slightly. I did a mix of raspberry jam and creme de cassis in my trifle.
  
I spread a layer of my custard-whipped cream mixture over the cake, trying to mush it into all the cracks and crevices.
On top of the custard cream, I placed a layer of sliced strawberries.
That's one layer. Cake, liqueur and jam drizzle, custard cream and berries. This layering gets repeated until there are not more ingredients left, finishing with cream to create a smooth top.
I managed three layers of trifle-y goodness, oozing with juicy berries. So yummy.
I saved a few strawberry slices to decorate the top of the trifle - that's why finishing with a smooth cream layer is a good  idea.
 
That's it! The trifle goes in the fridge for a little to chill, but you could also serve it right away. Don't forget to cover the dish with a lid or plastic wrap so it doesn't dry out and you can easily keep it for a few days - that is, if you don't eat it all in one sitting! Now go make some!

For more trifle-making deliciousness, check here.

Wednesday, February 22, 2012

Internet inspiration realized!

 I've been doing a lot of web browsing lately, just looking at stuff. Nothing in particular, either, just stuff. I get caught up in craft blogs. sites about food and wine, pages full of upcycling, and on and on. I just click on am interesting link, which leads to an interesting page, which might contain another link leading to another page...You get the idea. It's easy to to lose yourself on the internet for hours, and never really know how you got there in the first place! So while browsing, I find myself taking notes of things I see that I like, that I would like to cook, or sew, or otherwise recreate.

 I returned to my notes for inspiration the other day, deciding on a beautiful little clutch I could whip up on the sewing machine.
Using newspaper, I drew out pattern pieces which I then used to cut out the fabric. I tend to chose projects that have very geometric shapes, visible seams or easy construction. I, in no way, consider myself a pro at this, I just like to tinker around with the sewing machine.The band measures 9 inches by 3 inches, and the pouch section measures 15 inches by 9 inches, with rounded corners along the bottom edge. All measurements include 1/2-inch seam allowances.
 I love this fabric. Every time I go looking for inspiration in the fabric closet, I come across this beauty, never really knowing what I should do with it. Finally, I have a project that will do it justice. I paired it with a brown vinyl left over from a costuming project, and a matching teal cotton I pulled from the quilting leftovers. 
 To match the bottom pouch section to the top band, I had to do a little gathering. It creates a nice visual effect, as well as providing ample storage space in the pouch section of the clutch.
 I pinned the pouch to the vinyl band, and stitched the two pieces together. I did this for the other half of the clutch, as well as both sides of the lining.
 I pressed the extra fabric towards the band section, then top-stitched the band for added strength and nicely-stitched details. I do like nicely-stitched details!
 I stitched the two halves of the lining together. Important: make sure to leave an opening at the bottom of the bag, to turn the piece right side out, Otherwise, be prepared to take up your seam ripper to free your bag!
I added some snaps to the top of the lining, to close the bag better. This is optional - the bag is small enough that a closure is not that important, but should you drop your clutch, snap will prevent your stuff from spilling out and all over the floor. Follow the package direction for installation, or check out some of the awesome vids available on Youtube. That's what I did.
After stitching both sides of the bag together, I turned the outer layer right side out.
I inserted the outside into the lining layer, which is still inside out. This way, the right sides of the fabric are facing each other.
With the seams lined up, I pinned the top edges together...
...and stitched.
See, this is where that hole in the bottom comes in handy. Pull the whole bag through the hole in the bottom of the lining and voila! you bag is turn right side out. Otherwise, get out your seam ripper...
Push the lining inside the bag, press the edge, then top-stitch the top edge.
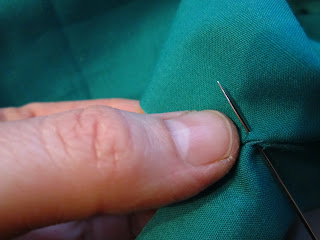
 One last line of stitching, this time by hand, to close up the bottom of the lining, and that's it! I managed to finish up my clutch in about 4 hours, with a little playing around with the pieces and such - should take about 3 hours the next time. Think of it as a nice little afternoon project, and elegant enough for an evening out! Now, what to wear...